
Accessing and Updating a Database
In this tutorial, we will learn how to interact with a database from Unity, using some simple but effective techniques.
After completing this chapter, you will be able to:
- Understand basic database concepts.
- Understand how online databases can be accessed through scripting.
- Understand how to access a database from Unity.
- Save and access information about a player.
Introduction to Online Databases
As it is, you may know how to save information from a game so that it is kept between scenes using the player preferences. This being said, in many situations, there is data that you may like to keep centrally, so that it can be accessed by players (or Unity) regardless of the computer or device used by the player. This can, for example, consist of a list of high scores, players’ preferences, or players’ details. In this case, as for many web-based applications, these details are stored on a server in an online database.
So what’s a database?
To put things simply, a database is a collection of tables; each table contains specific information arranged in columns and rows. Each column corresponds to a specific attribute (e.g., name, score, etc.), while a row refers to a particular data set (each data set has the same type of attributes, but the values may differ between rows). For example, you could have a table that includes details about a player such as: login, password, high-score, last room explored, etc. So, to access this information, you would usually need to access the database and then select this particular table; once the table is selected, you would then look at the row that includes the information for a particular user or player. Each player could be identified by an id, or by their nickname. So, that’s it in a nutshell.
Now, in web development, accessing the database is usually performed with what is called a server-side script; a server-side script is a script, or a piece of code, that is saved on the server; when called, it is executed on the server and the results are then sent to the client (for example, your browser). These scripts can be written in several types of languages including PHP (Personal Home Page or Hypertext Preprocessor), a very popular server-side scripting language.
So, in a typical setting, you would do the following:
- Write a PHP script.
- This script would then be saved on a server.
- When executed (e.g., when a url that points to the script is entered in a browser), this script can do several things, including returning text (e.g., displayed onscreen), performing calculations, or accessing a database hosted on the same server.
- In the latter case, the database can be a MYSQL database.
So let’s look at what a PHP script looks like:
<?PHP

echo "Hello";

?>
In the previous script:
- The code <?PHP indicates that we start PHP commands.
- The second line uses the command echo to print (or output) the text Hello.
- The third and last line indicates the end of the PHP commands.
Since PHP is a web-based server-side scripting, it is possible to mix both PHP commands and HTML code in a given PHP script; to differentiate between these, PHP commands are usually included between the tag <?php (or <?) and the tag ?>.
- We could then usually save this script on a server and give it a name (e.g., hello.php)
- We would then typically execute this script by requesting the page hello.php and typing its url in a browser, for example: yourserver.com/hello.php
- You would then see the text “Hello” in your browser
In other words, by entering the url of the script, you are asking the server to execute the script; and in this case, the script will display, through the command echo, the text “Hello”
Now, of course, more complex tasks, including database access, can be done through PHP, but this is the general idea behind executing server-side scripts.
When you want to access an online database with Unity, the process is quite similar in the sense that you do the following:
- Create a C# script in Unity.
- Within this script, provide the url of the PHP script to be called.
- Call this url from Unity, so that the script is executed.
- Record the result sent from the PHP script in Unity (e.g., by using C#).
So now that you have a clearer idea of what server side scripting is, let’s have a closer look at the nitty gritty of accessing a database, before we can translate this skill to Unity.
Accessing a database through PHP
To access a database, you usually need the following:
- an IP address.
- a user name.
- a password.
When a database has been set-up, it is often associated with a user, its password, along with access permissions. The permissions for this user define what this user can or can’t do with the database (e.g., read or write). Once a database and the corresponding user have been created, tables can be created for this database; put simply, tables are similar to a spreadsheet with columns and labels for each column, and a new row for every new record. For example, we could create a table that is labeled player and that includes details about each player; details about each player would then be recorded in a corresponding row; these details could be, for example, an id, a password, or a high-score. As for the variables used in C# or JavaScript, each of these rows have a type: the id and the score could, for example, be integers, and the login could just be text.
So let’s look at a code example that illustrates how a database could be accessed through PHP. You don’t need to write this code yet; this is just provided as an example, and we will get to create such scripts later in this chapter.
<?php

function connect()

{

    $host="localhost";

    $database="mydatabase";

    $user="user1";

    $password = "mypassword";

    $error = "Cant connect";

    $con = mysqli_connect($host,$user,$password);

    mysqli_select_db($con, $database) or die("Unableto connect to database");


}

?>
In the previous code snippet:
- We create a function called connect that will perform a connection to the database of our choice.
- We declare variables that will be used to establish a connection with the database (note that each variable starts with the $ sign in PHP).
- $host: this variable defines the address of the host or the server that we would like to connect to; in our case, we will use the server where the PHP script is stored; this is usually referred as the localhost.
- $database: this variable refers to the database that we want to access; we will see, later in this chapter, how to set-up this database along with users that can access it.
- $user: this refers to the user we have defined for this database.
Note that several users can be granted access to a database, all with different levels of permissions. It is usually a good idea to define at least two levels of permissions; for example, one user with read-only access, and another user with read and write access.
- $password: this refers to the password defined for the user (s) stated above.
- $error: this will be the error displayed if PHP can’t manage to connect to the database.
- We then create a connection to the server using the variable defined previously through the command mysqli_connect.This is a built-in PHP function.
- We finally select the database defined previously; if this is not possible (i.e., error when trying to access the database), we display an error message.
So at this stage, we can understand some of the code that can be used to connect to a server and a corresponding database; we will now look at how it is possible to read from a database in PHP.
In PHP, it is possible to request information from a database using what is called a query. This query is usually performed using what are usually called SQL commands. SQL commands make it possible to select a database and a table to, for example, read information from or write data to a table. These commands can only be processed once a connection has been established with the server and the database.
So let’s say that we’d like to read all the records from a specific table; we could then use the following code:
$query = "SELECT * FROM players";

$result= mysqli_query($con, $query);

$n = mysqli_num_rows($result);

for ($i = 0; $i < $n; $i++)

{

    $name = mysqli_fetch_assoc($result)["name"];

    $score = mysqli_fetch_assoc($result)["score"];

    echo $name."\t";

    echo $score."\n";

}
In the previous code:
- We create a new string called $query; this string includes an SQL query that basically selects all records from the table called players. The star character * indicates that all records are selected (we will see, later-on, how we can focus on or select a particular record).
- We then execute this query using the command mysqli_query; the result of the query (the information returned by the database) is then stored inside the variable called $result.
- Because the table may include several records, we could obtain several records in the results and the number of records, in this case, is stored in the variable called $n;
- We then loop through all the records sent back from the database (in response to our query), and for each record we access a particular attribute (or column). So the attribute name is saved in the variable $name, and the attribute called score is saved in the variable called $score using the command mysqli_fetch_assoc. The mysqli_fetch_assoc command includes two parameters: (1) the result (records) returned by the database based on the query, and (2) the attribute that we are interested in.
- Finally, we display the corresponding name and score.
Note that using SQL commands, it is also possible to sort the results based on specific criteria; for example, we could ask the database to return the name and score, and to order these in ascending or descending order of scores.
Let’s look at the next code snippet to illustrate this principle.
$query = "SELECT * FROM players ORDER by score DESC";
In the previous code, the SQL query requests all records from the table players; it also requests that these should be ordered in descending order of scores.
We could also, to make this even neater, limit the result to the top three scores using the following query.
$query = "SELECT * FROM players ORDER by score DESC LIMIT 3";
In the previous code, we add the command LIMIT to limit the number of records returned from the database to 3.
One of the other interesting things we can do is to write data to a database; for example, you may register a new player in the database and save or update its score; this, again, can be done with SQL queries. So let’s see how this can be done.
The following example illustrates an SQL query that inserts a new player as well as its score in the database.
$name = “Paul”;

$score = 25;

$query = "insert into players values ('$name', '$score');";
In the previous code:
- Two variables are declared for both the name and the score of the player.
- We then create a query that will insert a new record in the table called players; for this new record, the two columns for the player’s name and score will be set with the values previously defined.
Now, the previous scenario may happen only when the user registers for the first time in the database; what may happen next, is that the player may need to save or update its score after each subsequent game. In this case, because the player’s information have previously already been recorded in the database, we could use another type of SQL command, the command UPDATE, as illustrated in the next code.
$name = “Paul”;

$score = 25;

$query = "UPDATE players SET score = '$score' WHERE name = '$name'";
In the previous code:
- We define the variables $name and $score.
- We then create a query that updates the columns score in the table called players fort the record with the name $name. So here, we need to be more specific so that we can access a particular row; this row is identified by its attribute called name; so it is assumed that all players have a different name in this case.
So, as you can see, using SQL commands you can do several things including reading a table, writing to a table, or even updating a table. For the latter, you need to specify an attribute that will identify the row that you need to specifically modify; this is often an id, but it can consist of other types of variables if need be.
Passing data to a PHP script
One of the last things that will be of help when transferring data between Unity and a database, is the ability to pass information to a PHP script; in many cases, you will want, not only to receive information and data from the script, but also to be able to pass data to the script, so that this data can be processed by the script and used to, for example, update the database or check for some information (e.g., login details). For example, you may want to check the login or password for a particular user, or specify what record should be updated and what data should be used in this case.
In PHP you can pass variables along with their values by adding them to the url of the PHP page as follows:
http://www.mysite.com/index.php?playerName=john&score=100
In the previous code:
- We first use the url of the PHP page and then add variables after the url of the page.
http://www.mysite.com/index.php
- A question mark is added to the url.
http://www.mysite.com/index.php?
- Then the name of the variable and its value are passed using the syntax variable = value.
http://www.mysite.com/index.php?playerName=john&score=100
- The & character is used between each pair of variables and values.
- So here, we have two variables (playerName and score) along with their corresponding values (john and 100).
So once this information is passed to the PHP script, it can be captured (and used) by the PHP script as follows:
<?php

    $name = $_GET[‘playerName’];
    $score = $_GET[‘score’];

?>
In the previous code:
- We define two variables $name and $score.
- The first variable is initialized with the value of the variables playerName passed to the PHP script through the url (as we have seen earlier).
- The same is done for the second variable, except that this time we use the variable score.
So that’s pretty much it as far as PHP and MYSQL are concerned; there is, of course, more to SQL and PHP programming; however, to be able to access the database, the previous sections should be sufficient to understand how this works.
So when your PHP scripts have been created and your database set up, the last thing you will need to do will be to connect to the PHP script through Unity. This can be done using the WWW class, a class that makes it possible to retrieve content from a url, as illustrated in the next C# code snippet.
String url = http://www.mysite.com/index.php?playerName=patrick&score=90;

WWW www = new WWW(url);

yield return www;
In the previous code:
- We create an object of type WWW that will point to a specific url.
- We then wait until the content has been downloaded from this url.
Setting up your server
Great. So I hope that the whole principle behind accessing a database from Unity is clearer now (and if it’s not, the next section will help you to put this knowledge into practice). So in the next sections, we will create a simple system whereby:
- A player will be asked for his/her id.
- If the id is already in the database, then the database will be updated with the new score.
- If the id is not in the database, then a new record will be created for this player with an id of his/her choice, along with the new score.
- Once the score has been saved, the top 5 scores (i.e., high scores) will be displayed onscreen with their corresponding names.
So the workflow will be as follows:
- Set-up the database and associated users.
- Create a new table with some players and corresponding scores.
- Create PHP scripts that will be able to either insert data in, update, or read from the database we have created.
- Save these scripts on the server.
- Design a simple user interface in Unity whereby players can enter their id or register.
- Access the PHP scripts that we have created previously in order to perform the previous tasks.
So first, let’s setup your server. In order to execute the PHP scripts, these scripts need to be saved on a dedicated server. This server will also make it possible to create and set up your database. If you already have your own website, the chances are that you also have different packages installed that make it possible to set-up a database, as described in the next figure.

Figure 1: Database tools included in web packages
For example, in the previous figure you can see some of the standard tools offered as part of your control panel (if you have a control panel included in your website package), to manage databases, including PHPMyAdmin, and MySQL Databases. The former will make it possible to create new databases, while the latter will make it possible to create and update new tables.
Now, you may not have a website with these tools, and that’s perfectly fine too. In fact, if you have never done any server-side scripting before, I would suggest that you use a local server for the time being. You could, in this case, use a tool called WAMP (if you are using a windows machine) or MAMP (if you are using a Mac). This software includes an Apache server, one of the world’s most used web servers, and PHP (so that you can run PHP scripts), along with MySQL. MAMP is available from the official website: https://www.mamp.info/en/.
AMP stands for Apache (the web server), MySQL, and PHP. It is a package that includes all the elements needed to run PHP scripts and access a MYSQL database. I would suggest that you use this package (instead of web server) for the next sections of the chapter, as it should make the creation of your database much easier.
When you are using this software (i.e., M-AMP or W-AMP), the only difference is that your server is hosted on your own computer (rather than online), which makes testing easier, because you do not need to be connected to the Internet in order to access the server or connect to the database. Once your code has been tested locally (i.e., using WAMP or MAMP), you can then create the database on the remote server and upload your PHP code so that the application runs “live”, and so that it is accessible from anyone through the Internet.
Whether you are using a local server (i.e., MAMP or WAMP) or a remote server, you will connect to the server using the address localhost or 127.0.0.1 because the pages will be hosted where the server is (either on the remote or the local server).
So, if you are using a remote server (but again, I suggest that you use W/MAMP instead, as explained in the next sections), you will need to do the following:
- Create a new database using the MySQL Databases tool
- Create a user with sufficient rights to access the database and complete some commands such as READ, WRITE or UPDATE.
- Add tables and their content to the database using PHPMyAdmin.
Creating your database using a remote server
You can skip this section if you are using (or prefer to use) a local server (e.g., W/MAMP). In fact, I would strongly suggest that you skip to the next section, called Creating a database using a local server, if you don’t already have some experience with PHP or PHPMySQL or setting-up a remote server.
So, let’s get started!
Please note that the look and feel of the control panels may differ across hosting companies; however, the principles and the steps explained in this section should remain relevant.
To create your database:
- Connect to your website.
- Open your control panel.
- Click on MySQLDataBase tool.

Figure 2 :Selecting MySQL Databases on the remote server
- Once the new page opens, enter the name of your database and click on Create Database.
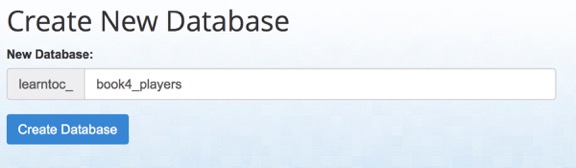
Figure 3: Creating a new database on a remote server
- The following page will then be displayed to acknowledge that the new database has been created.
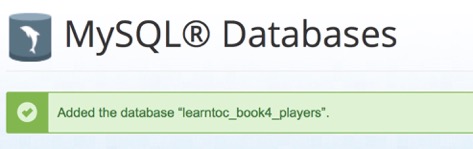
Figure 4: Confirming that the database has been created
- You can then click on the button labelled Go Back, to return to the previous page.
- At this stage you should see that your new database has been created, as described on the next figure.

Figure 5: The new database has been created
However, you will see that it doesn’t have any associated users who could be using it, or corresponding access rights. So we will need to add such users:
- Please scroll down to the section called MySQL Users.
- Create a new user by setting a name and a password.
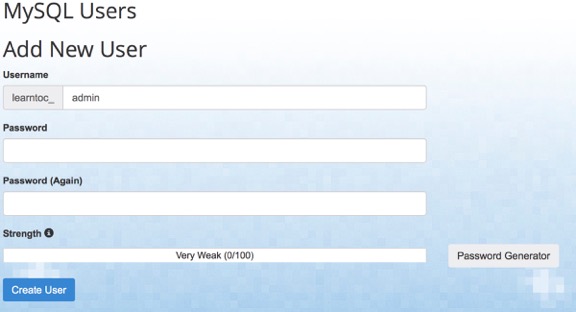
Figure 6: Creating a new user for the database
Please take note of the name of the user, along with its password, as we will need this information later-on when accessing the database through PHP.
- Once this is created, a confirmation page should be displayed as follows.
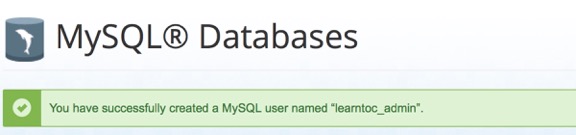
Figure 7: Confirming the creation of a database user
- You can then click on the button labelled Go Back, to return to the previous page.
The last thing we need to do now is to associate this new user to the database that we have just created:
- Please scroll down to the section called Add User to Database.
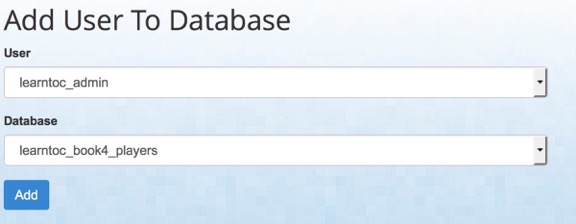
Figure 8: Adding a user to our database
- Make sure that the correct user and database are selected (using the drop-down menus). For example, in the previous figure you can see that I am setting privileges for the user learntoc_admin (created previously) to be linked to the database learntoc_book4_players.
- Then click on the button labelled “Add”.
- This will open a new window labelled Manage User Privileges.
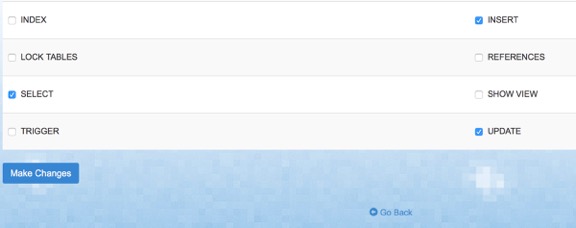
Figure 9: Managing user privileges
- In this window, select the privileges SELECT, INSERT and UPDATE, as described on the previous figure. These are the key commands that we will need to perform.
- Once this is done, click on the button labelled “Make Changes”.
- The following window should then appear:
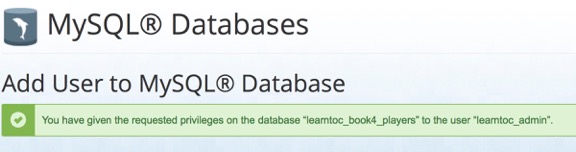
Figure 10: Confirming changes to privileges
- Please click on the button called “Go Back”
So at this stage, if you are using a remote server (i.e., your web host), you have managed to create a database, an associated user, along with access rights for this user: so we are almost there :-).
Creating a database using a local server
So if you are using a local server (i.e., W/MAMP), the steps to create your database and associated user will be slightly different; however, the idea and principles will remain similar.
- Please download the software MAMP (if you are using a Mac) or WAMP (if you are using a Windows-based computer) from the following site:
https://www.mamp.info/en/downloads/.
- Install it on your computer following the instructions.
- Once it is installed you can launch it, and the following (or similar window) will appear.
Bear in mind that the examples provided in the next section are from a Mac OS (i.e., using MAMP), so the screen on Windows computers may differ slightly; however, the layout should be similar.
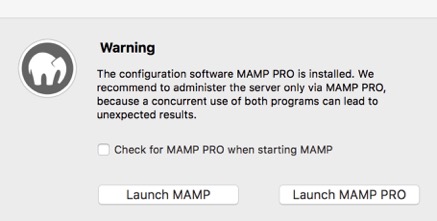
Figure 11: Launching your local server
- Launch the application by clicking on “Launch MAMP”.
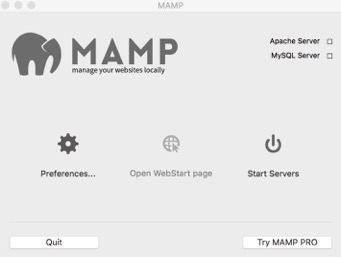
Figure 12: Selecting the servers to launch
- In the next window, click on Start Servers (as described in the previous figure).
- After a few seconds, you should see that the icons located in the top-right corner of the window are ticked (green) indicating that the Apache Server and MySQL servers have started.
- A new page will also open in your browser, as described in the next figure.

Figure 13: Displaying the welcome page after a successful installation
This page includes some important information, including a default hostname, a user name, and password for this user to access the server through PHP, along with a PHP example.
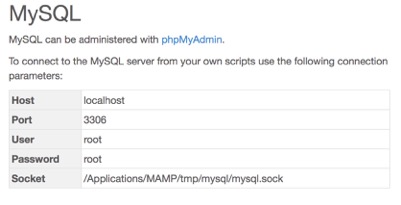
Figure 14: Default settings for the database
So, at this stage, our servers are running; the only thing that we need to do is to create a database; note that because this set-up will be used locally, we can use the default user root which has, by default, all access privileges to the database (e.g., READ, WRITE, UPDATE, and SELECT, etc.). So let’s create a new database:
- Select the tool PHPMyAdmin from the drop-down menu located at the top of the browser in the page that is already open (as described on the next figure).
If the MAMP window is not opened yet, you can open it using the url http://localhost:8888/MAMP/?language=English

Figure 16: Accessing PHPMyAdmin
Note that you can also use the address http://localhost:8888/PHPMyAdmin/ to access PHPMyAdmin on your computer. This will open a new window with information on your MYSQL database.
- Click on the tab labelled Databases.
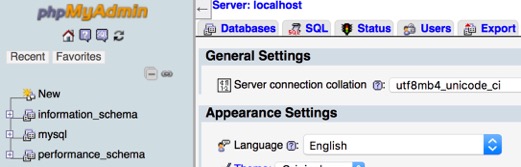
Figure 17: PHPMyAdmin’s front page
- Give a name to your database, for example players, and click on the button labelled Create (leave the Collation default option).
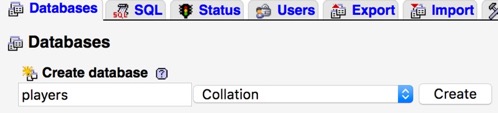
Figure 18: Creating a new database on the local server
- At this stage, as the database has been created, you will see it listed in the left frame of the window, as well as at the top of the window.

Figure 19: The new database listed in the left frame of the window
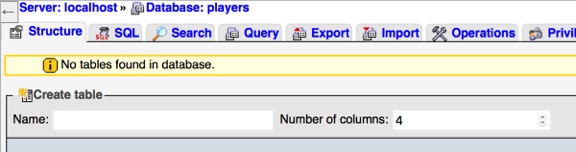
Figure 20: The new database listed at the top of the window
- Please click on the tab called Privileges.
![]()
Figure 21: Creating new privileges
You should see that, by default, a user root has already been created; the default password for this user is root.

So at this stage, we have managed to create a database on the local server (or the remote server if you have followed the previous section), and it is time to create a table that will hold information about the players’ score.
Creating new tables
The following can be performed whether you use a local or a remote server. The only difference is the way you access PHPMyAdmin; you can use the address http://localhost:8888/PHPMyAdmin/ if you are using a local server.
- Please open PHPMyAdmin.
- Select your database (i.e., click on it in the left-hand menu).
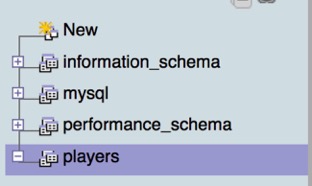
Figure 23: Selecting your database
- Select the tab called Structure. This section makes it possible to define the structure of a table including the name and the type of the columns within.
Figure 24: Modifying the structure of the database
- Within this tab, specify a new name for the new table, for example high_scores, and a number of columns (2: one for the name and one for the score), as illustrated in the next figure.

Figure 25: Initializing the table
- Click on the button labelled Go, located at the bottom of the page, to complete the creation of the table.
- In the new window, that will be used to specify the name and type of the variables stored in the table, please enter the following information:
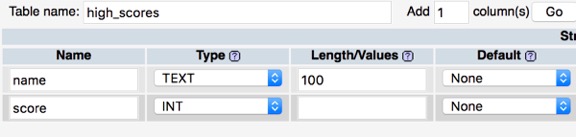
Figure 26: Defining the structure of the table
Row1:
- Name = name
- Type = TEXT
- Length/Values = 100
- Leave all other options as default.
Row2:
- Name = score
- Type = INT
- Leave all other options as default.
Once this is done, please click on the button labelled Save, located in the bottom-right corner of the window, as illustrated in the next figure.
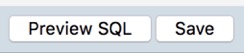
- Then the following window will appear, indicating that the table was successfully created; it should include the columns that we have defined previously (e.g., name and score).
Figure 28: The table has been created
So at this stage, we just need to add information to this table so that we can access it and test it accordingly from PHP.
- Please select the tab called Insert from the top of the window; this section is used to insert rows (i.e., data) into our table.
![]()
- Insert two new records as follows:

Figure 29: Adding record to the table
Record1:
- Name = player1
- Score = 10
Record2:
- Name = player2
- Score = 20
You can then click the button labelled Go located after the second record.
Note that you can add one or several records (or rows) at a time. This can speed-up the process of setting up your tables.
Although we don’t need it now, for those used to SQL commands, the following could have been used within the SQL window (i.e., the SQL tab). This will have the same effect as creating the previous record manually.
INSERT INTO `players`.`high_scores` (`name`, `score`) VALUES (‘player1′, ’10’), (‘player2′, ’20’)
So now that this has been done, it is time to use some PHP code to access the database.
Creating and running your PHP script
In this section, we will locate where to create and execute your PHP script on your computer, and then write the necessary code to access our database from your script.
If you are using a remote server, your script can be added anywhere within the public_html or www folder; this folder is usually the folder where all webpages to be accessed by Internet users can be seen and/or executed. So, if your script is called accessDB.php and is stored in the public_html folder, then it will be accessible using: http://yoursiteaddress/accessDB.php. In order to add this file to the public_html folder you can either use file managers included in your web package or an ftp client.
An FTP client is a software that makes it possible to connect to your website and to transfer files from or to it. If you are using an ftp client, you will need to connect using the details provided by your host (the name of the server, along with an ftp user and password).
If you are using WAMP or MAMP, the location for your PHP files (also referred as the www folder) will be as follows;
- For MAMP (Mac OS) the folder is: Applications/Mamp/htdocs
- For Wamp (Windows) the folder is: C:\wamp\www\
- From now, this folder will be refereed as the www folder, whether you are using a local or remote server.
So, if your script is called accessDB.php and is stored in the www folder, it will be accessible using: http://yoursiteaddress/accessDB.php, if you are using a remote server, and http://localhost:8888/accessDB.php if you are using a WAMP or MAMP server.
When using a local server through MAMP or WAMP, the url used to access your PHP script includes the address of the server (i.e., localhost), as well as a default port for AMP (8888). The port can be compared to a phone line through which the server listens to and replies to queries.
Next, we will be specifying the PHP version that we will be working with; for the code introduced in this chapter, the version 5 of PHP will be used, although if you read this book a few months or years after it has been released, this version may or may not be available. There are slight differences across PHP versions; this being said the concepts introduced in this chapter shall remain similar across versions (e.g., +/- minor necessary changes).
If you are using a local server:
- Open the MAMP admin.
- Click on the icon called Preferences.
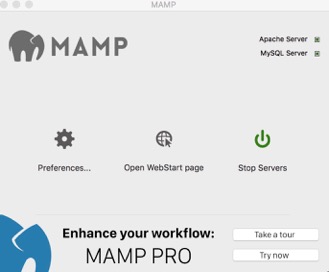
Figure 30: Opening the MAMP admin
- In the new window, select the tab called PHP.
- Select the Standard Version 5.6.25.
Please note that these PHP versions may differ over time; however, the principle explained in the next pages should remain similar.
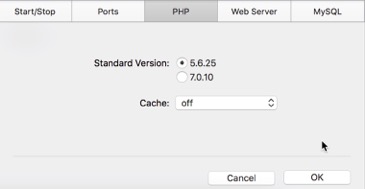
Figure 31: Selecting the PHP version
- Click OK.
- The server will then restart; you can then check that the correct version is running by opening the url: localhost:8888/MAMP/ in your browser, and then by clicking on the tab called phpinfo.

Figure 32: Opening the PHP information page
This should display your PHP version at the top of the page.
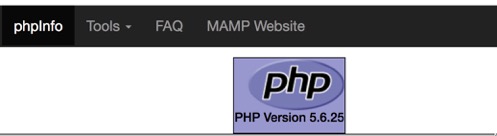
Figure 33: Displaying the current PHP version
Next, we will also make sure that any PHP error is displayed onscreen, so that we can see if and where these occur; to do so, we will need to modify a file called PHP.ini; the location of this file is provided in the phpinfo window in the section labeled Configuration File. So if your open the url localhost:8888/MAMP/, and then click on the tab called phpinfo, you should see the corresponding section, as described in the next figure.

Figure 34: Finding the location of the PHP.ini file for a Mac computer
Please note that the previous figure shows the path to the file PHP.ini on a mac computer; the path for a windows machine should be different.
So we can now access and modify this file using the path provided by phpinfo.
- Please open this file (i.e., php.ini) using a text editor of your choice.
- Search for the text display_errors.
- Once you have found it, please replace the text display_errors = Off with display_errors = On, as described on the next figure.

Figure 35: Modifying the PHP.ini file
- Please save the file.
So that this change can be applied, we need to restart the server:
- Please stop the server using the AMP control panel.
- And restart it again.
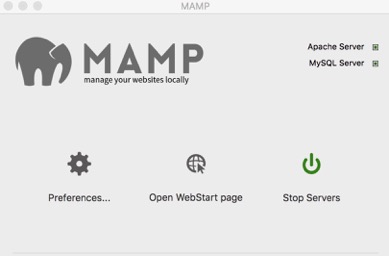
Figure 36: Stopping the server
So let’s test our PHP settings:
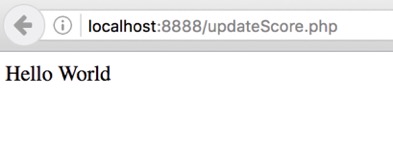
- Please create a new file with the text editor of your choice, and save it as updateScore.php inside the www folder.
For Mac OS computers, the www folder is located in Applications/Mamp/htdocs
For Windows computers the www folder is located in C:\wamp\www\
- Add the following code to it.
<?php

    echo "Hello World";

?>
- Once this is done, save the file, and open this page in your browser, for example, by typing the following address.
http://localhost:8888/updateScore.php
- If you are using a remote server, the url may look like: mywebsever.com/updateScore.php.
- This should display the text “Hello World”.
Once this is done, we can try to connect to our database. Note that if you are using a remote server, you will need to use the information that you created when initially you set up the database.
- Please add the following code to the file updateScore.php.
<?php

    echo "Hello World";

    $host="localhost" ;

    $database="players";

    $user="root";

    $password = "root";

    $error = "Cant connect";

    $con = mysqli_connect($host,$user,$password);

    mysqli_select_db($con, $database) or die("Unableto connect to database");

?>
In the previous code:
- As we have seen in the previous sections, we connect to our database using the default user and password for our localhost.
- If no error message is displayed, then the connection has been successful.
Next, we will try to read some records from the database.
- Please add the following code to the PHP script:
$query = "SELECT * FROM high_scores";

$result= mysqli_query($con, $query);

$n = mysqli_num_rows($result);

for ($i = 0; $i < $n; $i++)

{

    $name = mysqli_fetch_assoc($result)["name"];

    $score = mysqli_fetch_assoc($result)["score"];

    echo "Name:".$name;

    echo "Score:".$score;

}
- Save your PHP file.
- Switch to your browser and refresh the following page.
http://localhost:8888/updateScore.php
- The following should be displayed:

Figure 38: Displaying the output from the database after reading it
If you see this output, you have successfully managed to access and read data from the database. Congratulations!
Now that we know that our PHP script works and that we can access the database, we will modify it and create a new C# script in Unity so that we can read and display this information in Unity.
- Please comment the following line in your PHP script, as follows:
//echo "Hello World";
In PHP, as for C# or UnityScript, you can comment your code using // to comment only one line or /* and */ at the start and the end of the section that you would like to comment.
Now that it is done, let’s work on the Unity side of things and try to access this PHP script and gather its output (i.e., the list of players and their score) from Unity.
- Please launch Unity.
- Create a new project (File | New Project).
- Create a new empty object and rename it accessDB or a name of your choice (Game Object | Create Empty).
- Using the Project window, create a new C# script (Create | C# Script) called AccessDB.
- Add the following code to it.
using UnityEngine;

using System.Collections;

public class AccessDB : MonoBehaviour
{

    string url = "http://localhost:8888/updateScore.php";

    // Use this for initialization

    IEnumerator Start()

    {

        WWW www = new WWW(url);

        yield return www;

        string result = www.text;

        print("data received"+result);

        }

    void Update ()
    {


    }

}
In the previous code:
- We declare the class AccessDB.
- We then create a string called url that stores the address of the PHP page that we will access.
- We declare a function called Start using the keyword IEnumerator beforehand. This keyword is used to specify that the function Start has become a co-routine, which means that it now has the ability to be paused until a condition has been fulfilled.
- In our case, it is necessary to declare this function as a co-routine because the code that we use to gather information from the PHP script will need to send a request to the server and then wait for the answer. However, we don’t want the whole programme to stop while this data is on its way (e.g., we still need to update the screen and perform other important tasks). So in that sense, this function does not act like a usual function, in that it doesn’t just perform actions and return to where it was called from; instead, because part of its tasks is to gather (and possibly wait for) information from the server, which may involve delays, as a co-routine, this function will fetch for the server’s data and pause itself until the data has been received. Meanwhile, other functions (such as the Update function, for example) will be able to run in the meantime; then, when the data is received from the server, the Start function is called again just after the point where it had been paused.
We will see more about co-routines in the next chapters; however, in a nutshell: co-routines are a bit like a soccer team where the ball is passed to a player; this player takes the ball and starts to run, however, s/he needs information from the team doctor to know whether s/he can go ahead and what s/he can do to heal a recent injury; so s/he just passes the ball to another team mate and freezes (yield) until s/he receives instructions from the doctor. When s/he receives this instruction, the ball his passed to him/her again and s/he resumes to play. So in this case the players share the ball, but only one player has the ball at one particular time. So co-routines are a way to collaboratively run a program with only one function running at a time. If you have used threads, co-routines and threads differ in that threads run in parallel whereas co-routines work collaboratively to freeze one function and give it the focus again when criteria have been fulfilled (only one co-routine running at any given time). Co-routines are usually referred as concurrency as they pass control to each-other.
- We then declare an object of type WWW that will be used to run the PHP script using the url variable defined earlier.
- We use the command yield to wait (or “freeze” this function) until the data has been returned by the server.
- When the data has been received, it is saved as text, using the variable www.text and printed in the Console window.
When this is done, you can make sure that the MAMP server is running, add the script to the object accessDB (i.e., drag and drop), play the scene, and check the Console window which should look like the following figure.
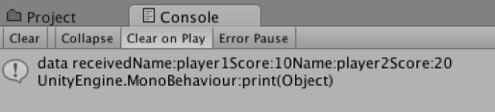
Figure 39: Receiving data from the server (through PHP)
So if you see this message, you have successfully managed to connect to the database and to read its content from Unity. Well done!
Now, while we have managed to collect this information, we could try to display it in a text field; this will mean that we need to create a field, write this confirmation to it, but also format our text, as for the time being, the text gathered from the PHP script may not be easily readable.
- Please open the PHP script that you have created earlier.
- Modify it as follows.
- Change the code…
echo "Name:".$name;

echo "Score:".$score;
- to…
echo $name."\t";

echo $score."\n";
In the previous code:
- We have modified the line of code that displays the name by adding the character “\t” which is a tabulation.
- We have modified the line of code that displays the score by adding the character “\n” which adds a line break.
Now that this change has been made, we can save the PHP script and focus on our C# script.
- Please save the PHP script.
- Switch back to Unity.
- Create a new Text UI object (Create | UI | Text).
- Rename it high_scores.
- Change its height to 200.
- Move it to the center of the screen using the Move tool (you can switch temporarily to the 2D mode, and then click on this object in the Hierarchy window).
- Using the Inspector, you can empty its text field.
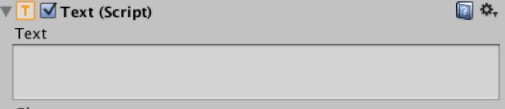
Figure 40: Emptying the text field
Modify the C# script as follows:
- Add the following code at the beginning of the class.
using UnityEngine.UI;
- Modify the code in the Start function as follows:
IEnumerator Start()

{

    WWW www = new WWW(url);

    yield return www;

    string result = www.text;

    print("data received"+result);

    GameObject.Find ("high_scores").GetComponent<Text> ().text = result;

}
Please save the C# script, play the scene and check that the name of the players (and their scores are displayed in the text filed that you have created).
Now that we know that our PHP script works and that we can access the database through Unity, we will modify our code so that we can obtain two types of information: (1) whether a user is actually present in the database, and (2) the score for this player, if it already exists in the database.
Updating the player’s records
In this section, we will create a simple interface that will be used to capture the player’s name or nickname. Once this information is captured, we will access the database, and check if the user exists. If this is the case, then we will just update the database, otherwise, we will create a new user with the corresponding score. The score, for this example, will be hardcoded, for the time being.
Let’s start by creating the interface.
- You can switch to the 2D mode for now, if you wish, using the 2D button located in the top left corner of the Scene view.
- Please create a new Input Field (GameObject | UI | Input Field).
- This should create an object called Input Field within the Canvas object; within this object, you will also see two objects called Placeholder and Text, as described in the next figure.

Figure 41: Creating the InputField object
- Play your scene: you should be able to see the input field as described in the next figure.

Figure 42: Testing the Input Field object
At this stage we can type text in this field; however, we need to find a way to store this information when the user presses the “Enter” key or another key or button of our choice.
So, to be able to check whether the user has validated its entry (e.g., by pressing the “Enter” key), we will create a script that detects when this happens; this script will then store the value that has been entered in the text input field.
- Please create a new C# script.
- Name this script SaveScore for example (or any other name of your choice).
- Add this script to the object InputField.
- Open this script to edit it.
Add the following code at the top of the script, so that we can refer to UI object easily:
using UnityEngine.UI;
- Please add the following code in the Start function:
gameObject.GetComponent<InputField>().onEndEdit.AddListener(saveScore);
In the previous code, we do the following:
- We access the InputFieldComponent for the object linked to this script (i.e., InputField).
- We then use the event onEndEdit, which means that we will be tracking when the user has finished editing his/her text.
- When this happens, we will call a function called saveScore (that we yet have to create).
- So to summarize, we create an event listener for the event onEndEdit that will be linked to the function saveScore. So this function will “handle” the event.
Last, we just need to create this function:
- Please add the following code within the class (e.g., after the Update function).
void saveScore(string textInField)
{

    print ("Starting to save score for user "+textInField);

}
- Please save your code.
You can now test the scene by doing the following:
- Play the scene.
- Enter text in the text field.
- Press the “Enter” key on your keyboard.
- Look at the Inspector and see whether the text is displayed there.
So, if this is working, we know that we can enter text in (and gather text from) the input field; we just need to be able to send this text to a PHP script that will check whether this user exists.
- Please duplicate the file updateScore and rename the duplicate updateScore_b (please keep the duplicate file in the same folder as the original PHP file).
- Open this file (i.e., updateScore.php).
- Comment or delete the following code.
/*$query = "SELECT * FROM high_scores";

$result= mysqli_query($con, $query);

$n = mysqli_num_rows($result);

for ($i = 0; $i < $n; $i++)

{

    $name = mysqli_fetch_assoc($result)["name"];

    $score = mysqli_fetch_assoc($result)["score"];

    echo $name."\t";

    echo $score."\n";

}*/
- Add the following code at the end of the script (new code in bold) instead;
mysqli_select_db($con, $database) or die("Unable to connect to database");
$name = $_GET['name'];
echo "name: ".$name;
In the previous code:
- As we have seen in the previous sections, the function $_GET[‘name’] will get (or obtain) the value for the variable called name that was passed as part of the url when the PHP page was called.
- This variable is then displayed onscreen.
We can now check our code:
- Save the PHP code and open your browser.
- Make sure that M/WAMP is running and that the servers (i.e., Apache and MySQL) are active.

Figure 43: Checking that the servers are active
- Open the url http://localhost:8888/updateScore_b.php?name=myname.
- The page should display the following text:
name: myname
So at this stage we know that we can successfully pass a variable (i.e., name) to the PHP page.
Now, the next step is to query the database for this particular name. In other words, we will try to access a record/row that corresponds to a user with the name that we have stored earlier.
- Please add the following code to the PHP script:
$query = "SELECT * FROM high_scores WHERE name = '$name'";

$result= mysqli_query($con, $query);

$n = mysqli_num_rows($result);

if ($n > 0) echo "Found 1 record"; else echo "Sorry not registered";
In the previous code:
- We create a query statement.
- For this query, we select all records from the table called high_scores, and then focus on the record for which the name is the one stored in the variable $name (if you remember, the value was passed as part of the url). 🙂
We can now test the code:
- Please save your code.
- Open this url in your browser:
- http://localhost:8888/updateScore_b.php?name=test
- The page should display:
name: Sorry not registered
- The mention “Sorry not registered” is displayed because we have made a mistake on purpose by asking the server to display a record that does not exits (i.e., none of the records currently available in the database and table have a name called “test”.
- Please open the url http://localhost:8888/updateScore_b.php?name=player1
- The page should display:
name: player1Found 1 record
Did you get the same results??
Yes..?
Perfect!
So now we just need to write code that either update an existing player’s record or adds a new player to the list.
- Please add the following code (new code is bold) to the PHP script (i.e., updateScore_b):
echo "name: ".$name;

$score = 100;

$query = "SELECT * FROM high_scores WHERE name = '$name'";

$result= mysqli_query($con, $query);

$n = mysqli_num_rows($result);

if ($n > 0)

{

    echo "Found 1 record";

    $query = "UPDATE high_scores SET score ='$score' WHERE name = '$name'";

}

else

{

    echo "Sorry not registered";

    $query = "INSERT INTO high_scores VALUES ('$name','$score')";

}

$result= mysqli_query($con, $query);
In the previous code:
- We temporarily set the score to 100.
- If a record is found with the same name, then we can update the record accordingly with the new value for the score. Here we use the keyword UPDATE in the query.
- If no corresponding record is found, we then create a new record (or row) in the table, by adding both the name and the corresponding score. Here we use the keyword INSERT in the query.
We can now check our code:
- Please save your code.
- Open the url http://localhost:8888/updateScore_b.php?name=player1
- Check the database, using PHPMyAdmin; you should see that the score of player1 is now 100 (remember, this value of 100 was hard-coded in the PHP script).
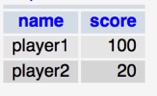
Figure 44: Updating the score of an existing user
- Open the url http://localhost:8888/updateScore_b.php?name=newUser
Check the database; you should see that a new player (newUser) has been added
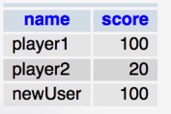
Figure 45: Adding a new user and a new score
One of the last thing we need to do is to pass not only the name of the player but also the score; for this, we will use the same techniques as previously using the statement $_GET.
- Please modify the PHP script as follows.
- Replace this code….
$score = 100;
- …with the following code, so that the score is now obtained from the url.
$score = $_GET[‘score’];
- Please save your code.
- Open the following url:
- http://localhost:8888/updateScore_b.php?name=newUser&score=250
- Check the database using PHPMyAdmin; you should see that the player newUser has an updated score of 250.
So at this stage, we are almost ready to go; our PHP script works perfectly; we just need to connect it to Unity, so that whenever the name is entered in the Input field and the return key pressed, the PHP page is called using (or passing) the proper name and score.
- Please switch to Unity.
- Open the script SaveScore.
- Modify the beginning of the class and the Start method as follows (new code in bold):
public class SaveScore : MonoBehaviour

{

    string playerNname;

    int score;

    // Use this for initialization

    void Start ()

    {
    gameObject.GetComponent<InputField>().onEndEdit.AddListener(saveScore);

    score = 1000;

    }

}
- Please modify the saveScore function as follows:
void saveScore(string textInField)

{

    playerNname = textInField;

    print ("Starting to save score for user "+textInField);

    StartCoroutine(connectToPHP());

}
- Then create a new function connectToPHP as follows:
IEnumerator connectToPHP()

{

    string url = "http://localhost:8888/updateScore_b.php";

    url += "?name=" + playerNname + "&score=" + score;

    WWW www = new WWW(url);

    yield return www;

    print ("DB updated");

}
In the previous code:
- We create a co-routine called connectToPHP.
- Within this function, we create a new url that includes the address of the PHP page that will connect to the database.
- We then open this url with the www object and wait (using the yield command) until we receive data.
- Once this is done, we display the message “DB updated”.
Once this is done, we can test our code:
- Please save your code, and play the scene.
- Enter a name in the text field.

Figure 46: Entering a name in the text field
- Press return.
- Using PHPMyAdmin, please check that the dataset now includes a new player with a score of 1000.
- In Unity, please empty the text field to enter the name player1, then press return and check that the database has been updated accordingly using PhPMyAdmin.
Please note that if you want to use a connection to a real server, you will probably need to set what is called a cross-domain policy. So you will need to create new file called crossfomain.xml and then add it to your remote server.
The structure of this file may look as follows:
<?xml version=”1.0″?>
<cross-domain-policy>
<allow-access-from domain=”*”/>
</cross-domain-policy>
For more information on cross-domain, see the following page.
https://docs.unity3d.com/Manual/SecuritySandbox.html
Level Roundup
Well, this is it!
In this tutorial, we have learned about communicating with a database, setting up a server, creating a database and tables, and finally reading from, writing to or updating a database through Unity. In the process we were also introduced to PHP and MYSQL commands, and we finally managed to create a system whereby the player’s score is saved in this database. So yes, we have made some considerable progress, and we have by now looked at some simple ways to store and access information about the game and the players on a server.
Frequently Asked Questions
This chapter provides answers to the most frequently asked questions about the features that we have covered in this book.
Accessing databases
How do I run a PHP script?
A PHP scrip needs to be executed by a server, so it needs to be hosted on a server and then accessed through its address (i.e., url). These scripts are usually saved in the public folder of the web server.
How do I access a database using PHP?
To access a database in PHP you need a server name (or address), a user name, a password, the name of a database, along with the name of the table that you need to access. In the next code snippet, you should be able to see how a connection is initiated in PHP through a function called connect; the function mysql_connect is employed to establish a connection to a server, based on settings such as: the name of the server, the name of the database to be accessed, a user name, and its password.
function connect()

{

    $host="localhost" ;

    $database="mydatabase";

    $user="user1";

    $password = "mypassword";

    $error = "Cant connect";

    $con = mysqli_connect($host,$user,$password);

    mysqli_select_db($con, $database) or die("Unableto connect to database");

}
Do I need to host my pages on a website to run PHP scripts or to create a database?
While an online server is a common solution, you can also download and install AMP and run the server on your own computer for testing purposes; AMP packages (MAMP or WAMP for example), include a web server, as well as MySQL, so that you can also create and access a databases hosted on your own computer, if need be.
In terms of accessing a database, what does the term localhost mean?
Localhost, when used within a PHP file, refers to the server where the PHP script is stored; so if the script is stored on your computer, and you have a local server, then the localhost will be the web server on your computer; however, if these files are hosted on a remote server, then this remote server will be the localhost in this case.
What is the link between Unity, PHP, and MYSQL?
When accessing a MYSQL database through Unity, the process is usually as follows: (1) Unity accesses a PHP page, this page contacts the database and performs actions (e.g., read or write); (2) in case data is read, this data is stored in the PHP script, and then sent back to Unity from this script.
What are SQL statements?
SQL statements can be used to perform a query on a database; they are set of instructions used to perform actions such as: selecting, ranking, reading or writing to records.
Why is there a need to set privileges for a database?
When you create an online (or local) database, you usually want to restrict access to it so that only admin users can modify it. This is so that the database is not changed by mistakes, or to avoid possible malicious and unauthorized changes to the database.
>> if you enjoyed this post, you can access more information and free books about Unity here. <<