Creating and moving the main character
In this section, we will start by creating an infinite runner game, a classic game genre on mobile devices; this game will have the following features:
- The player will have to avoid obstacles by jumping above them.
- Jumps will be performed when the player presses a key (for the web versions) or when s/he taps once on the right side of the device’s screen (for the Android version).
- The obstacles will come from the right side of the screen.
- If the player hits one of the obstacles, the game will be restarted.
- The player will have the option to pause the game.
- The score will increase with time.
So, after completing this chapter, you will be able to:
- Create a simple infinite runner.
- Add simple controls to the main character.
- Generate obstacles randomly.
- Detect collisions.
- Create a simple environment with basic shapes.
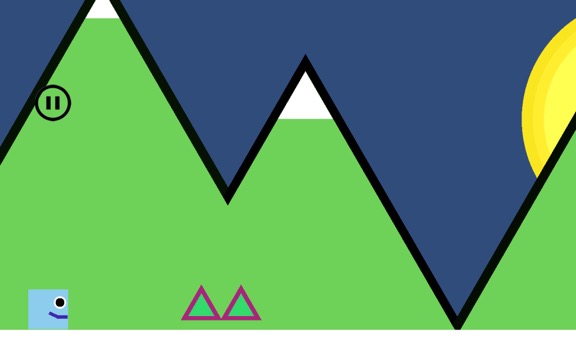
Figure 1: The final game
Adding movement to the character
So, in this section, we will start to create the core mechanics of the game; the environment will consist of a box for the player in addition to the ground.
So, let’s get started:
- Please launch Unity and create a new Project (File | New Project).

Figure 2: Creating a new project
- In the new window, you can specify the name of your project, its location, as well as the 2D mode (as this game will be in 2D).
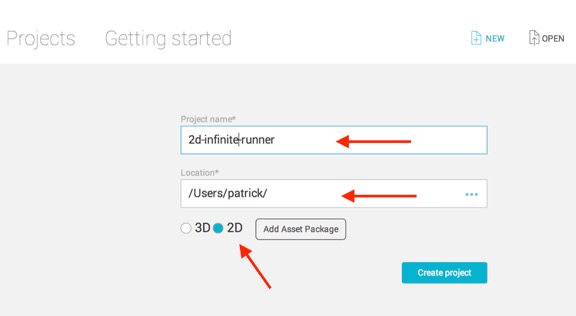
Figure 3: Specifying the name and location of your new project
- Once this is done, you can click on the button labeled Create project (i.e., the button located at the bottom of the window), and a new project should open in Unity.
- Once this is done, you can check that the 2D mode is activated, based on the 2D logo located in the top-left corner of the Scene view, as illustrated in the next figure.

Figure 4: Activating the 2D mode
First, we will remove the background image for our Scene. If you look at your Game view, it may look like the following figure.

Figure 5: The initial background
If it is the case, then please do the following:
- From the top menu, select: Window | Lighting | Settings.
- Then delete the Default Skybox that is set for the attribute called SkyBox (i.e., click on the attribute to the right of the label Skybox and press DELETE on your keyboard).

Figure 6: Lighting properties
- Once this is done, your Game view should look like the following.

Figure 7: The Game view after deleting the SkyBox
We will now create sprites that will be used for the ground and the player.
- From the Project window, select Create | Sprites | Square. This will create a sprite object called Square in the Project window.
- Please rename this asset ground (i.e., right-click + Rename).

Figure 8: Creating a new sprite
- Drag and drop this asset (i.e., ground) from the Project window to the Scene view.
- This will create a new object called ground in the Hierarchy.
- Select this new object in the Hierarchy, and, using the Inspector, change its scale attribute to (100, 1, 100) and its position to (0, -4, 0).
- Add a BoxCollider2D component to the object called ground (i.e., select Component | Physics2D | BoxCollider2D from the top menu); this is so that we can detect collisions between the player and the ground later-on.
Once this is done, we can then create the player.
- Please duplicate the object called ground in the Hierarchy (i.e., select the object + press the keys CTRL and D).
- Rename the duplicate player.
- Using the Inspector, change the scale of this new object to (1, 1, 1) and its position to (0, -3, 0).
- Add a 2DRigidBody component to this object (i.e., select Component | Physics2D | RigidBody2D from the top menu).
- Using the Sprite Renderer component of the object called player, change its color to a light blue.
By now, your scene should look like the following figure:

Figure 9: Drafting the scene
At this stage, we can start to add some code to be able to control our character. To do so we will do the following:
- Check when the player is on the ground.
- If this is the case and if the player presses the jump key (this key will be defined later), then the character will jump.
- It will be necessary to check whether the player is on the ground so that the character can’t jump while in the air.
So let’s proceed:
- Please create a new C# script called ControlPlayer: from the Project window, select Create | C# Script.
- Please add the following code at the beginning of the class.
bool isOnGround;
This variable will be used to check whether the player character is on the ground.
- Please add the following function to the class:
void OnCollisionEnter2D(Collision2D coll)

{
    if (coll.collider.name == "ground") isOnGround = true;
    else isOnGround = false;
}
In the previous code:
- We check whether a collision has been detected between the player and other objects using the built-in function OnCollisionEnter2D.
- If the other object has a tag called ground then the variable called isOnground is set to true; otherwise, this variable is set to false.
- Note that we yet have to create a tag for the ground and this will be done in the next sections.
We can now deal with the key inputs from the player:
- Please add the following function to the class:
void jump()
{
    GetComponent<Rigidbody2D> ().AddForce (new Vector2 (0, 400.0f));
    isOnGround = false;
}
In the previous code:
- We declare a function called jump.
- This function, when called, adds a vertical force to the player to simulate a jump.
- It also sets the variable isOnGround to false.
Last but not least, please add the following code to the Update function (new code in bold):
void Update ()
{
    if (Input.GetKeyDown (KeyCode.Space) && isOnGround) jump();
}
In the previous code, we detect when the player has pressed the Space Bar; in this case, we check that the player is on the ground and we then call the function jump accordingly.
Please save your script, check that it is error-free, and drag and drop it on the object called player in the Hierarchy window.
At this stage, we just need to create a tag for the ground.
- Please select the object called ground in the Hierarchy.
- In the Inspector window, click on the drop-down menu called Untagged, to the right of the label called Tag, as illustrated in the next figure.

Figure 10: Creating a tag
- Select the option Add Tag from the drop-down menu.

Figure 11: Selecting a new tag
- In the new window, press on the + button that is just below the label “List is Empty”, as illustrated in the next figure.

Figure 12: Creating a new tag (part 1)
- This will create a placeholder for the new tag that we want to create.
- Create a new tag by entering ground to the right of the label called Tag 0 as illustrated in the next figure.

Figure 13: Creating a new tag (part 2)
If you are using Unity 5.6, you will only need to enter the name of the tag.
Next, once this tag has been created, we can apply it to the ground object.
- Please select the object called ground in the Hierarchy.
- Using the Inspector window, click to the right of the label called Tag and select the tag called ground from the drop-down menu, as illustrated on the next figure.

Figure 14: Selecting a tag for the ground (part 1)

Figure 15: Selecting a tag for the ground (part 2)
You can now test the scene (i.e., CTRL + P); as you press the Space Bar, you should see that the player is jumping.

Figure 16: The first jump
Adding random obstacles to the scene
At this stage, we can make the player character jump, and we just need to add obstacles that will be generated at regular intervals; this will consist in:
- Creating an obstacle from a basic shape.
- Creating a prefab from this object.
- Creating an empty object, with an associated script, that will generate these prefabs at frequent intervals.
- Each new obstacle will be instantiated to the right of the player (i.e., outside the field of view) and will then start to move to the left (i.e., towards the player).
First let’s create this obstacle:
- Please duplicate the object called ground (i.e., CTRL + D).
- Rename the duplicate obstacle.
- Change its position to (3, -3, 0) and its scale attribute to (1, 1, 1).
- Using this object’s Sprite Renderer component, change its color to red.
- Finally, as we have done earlier, please create a tag called obstacle, and apply it to this object.

Figure 17: Adding a new tag for obstacles (part 1)

Figure 18: Adding a new tag for obstacles (part 2)
- We can now create a prefab from this object by dragging and dropping it to the Project window, as illustrated in the next figure.

Figure 19: Creating a new prefab
- Now that the prefab has been created, you can delete (or deactivate) the object called obstacle in the Hierarchy.
We will now create a new script for this object (i.e., obstacle), so that this objects starts to move to the left every time it has been instantiated.
- Please create a new C# script called Obstacle (i.e., from the Project window select: Create | C# Script).
- Add the following code to the Update function (new code in bold).
void Update ()
{
    transform.Translate (Vector2.left * 4*Time.deltaTime);
    if (transform.position.y < -5) Destroy (gameObject);
}
In the previous code:
- We move the obstacle at the speed of 4 units per second to the left.
- We also destroy this object once its y coordinate is less that -5; note that we could also use the function Destroy in the Start function, to delay the destruction of this object.
Please drag and drop this script (i.e., Obstacle) to the prefab called obstacle in the Project window.
Next, we need to create an object (and its associated script) that will generate the obstacle(s) at regular intervals.
- Please create a new empty object called generateObjects (i.e., select GameObject | Create Empty).
- Create a new C# script called GenerateObjects (i.e., from the Project window, select: Create | C# Script).
- Open this script.
- Add the following code at the beginning of the class.
public GameObject obstacle;
float timer;
In the previous code, we declare a GameObject variable called obstacle that is public; so that it will be accessible from the Inspector; it will be set with the prefab called obstacle later-on, using the Inspector. We also create a variable called timer that will be employed to time the instantiation of the obstacles.
- Please add the following code to the Update function (new code in bold).
void Update ()
{
    manageTimer ();
}
In the previous code, we call a function manageTimer that we yet have to create, and that will be in charge of checking when a new obstacle should be instantiated.
- Please add the following function to the class:
void manageTimer()

{
    timer += Time.deltaTime;
    if (timer >= 2)
    {
        addObstacle ();
        timer = 0;
    }

}
In the previous code:
- We define a function called manageTimer.
- In this function, the timer’s value is increased by one every seconds.
- If the timer reaches two seconds, then the function addObstacle (that we yet have to create) is called;
- The timer is also reset to 0.
Please add the following function to the class:
void addObstacle()
{
    Vector3 positionOfPlayer = GameObject.Find ("player").GetComponent<ControlPlayer>().initialPosition;
    GameObject t1;
    t1 = (GameObject)(GameObject.Instantiate (obstacle, positionOfPlayer + Vector3.right * 20, Quaternion.identity));
}
In the previous code:
- We define a function called addObstacle.
- This function initially detects the position of the player at the start of the game; since the player is initially on the ground, this will ensure that the obstacle will be created just above the ground.
- Note that we access a variable called initialPosition that we yet have to create in the script ControlPlayer.
- This position, stored in the variable positionOfPlayer, is then used to determine the position of the obstacle that will be located to the right of the player.
Please save your script.
Last but not least, we need to initialize the variable initialPosition for the script ControlPlayer:
- Please open the script ControlPlayer.
- Add the following code to it (new code in bold):
public Vector3 initialPosition;
void Start ()
{
    initialPosition = transform.position;
}
In the previous code:
- We declare a variable called initialPosition.
- We then set this variable to the position of the player at the start of the game.
- Note that the variable initialPosition is public, so it will be accessible from outside the script, including from the script called GenerateObjects.
Please save your scripts; check that they are error-free and drag and drop the script GenerateObjects from the Project window to the object called generateObjects in the Hierarchy.
Once this is done, you can select the object called generateObjects in the Hierarchy; if you look at the Inspector window, you should see that this object has a component called GenerateObjects, along with an empty placeholder (i.e., a public variable) called obstacle.

Figure 20: Initializing the obstacle (part 1)
- Please drag and drop the prefab called obstacle from the Project window to this empty field, as illustrated in the next figure.
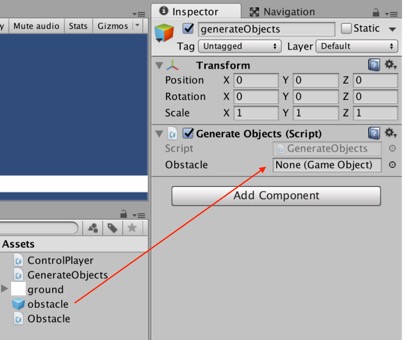
Figure 21: Initializing the obstacle (part 2)

Figure 22: Initializing the obstacle (part 3)
You can now test your scene, and you should see that new obstacles are being instantiated every two seconds, as in the next figure.
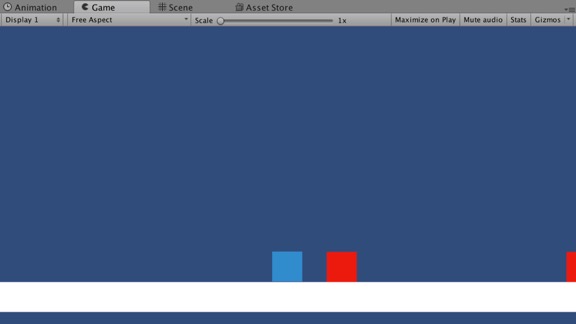
Figure 23: Instantiating obstacles
At this stage, we can instantiate the obstacles easily; however, we could improve the game by adding the following features:
- Instantiate double or triple obstacles so that the player has to adjust its jump, hence adding more challenge to the game.
- Instantiate the objects randomly so that the player never knows whether s/he will have to jump over one, two or three obstacles.
So let’s go ahead:
- Please modify the function addObstacle as follows:
void addObstacle()
{
    Vector3 positionOfPlayer = GameObject.Find ("player").GetComponent<ControlPlayer>().initialPosition;
    float randomNumber = Random.Range (1, 5);
    GameObject t1, t2, t3, t4;
    t1 = (GameObject)(GameObject.Instantiate (obstacle, positionOfPlayer + Vector3.right * 20, Quaternion.identity));
    if (randomNumber >1) t2 = (GameObject)(GameObject.Instantiate (obstacle, positionOfPlayer + Vector3.right * 21, Quaternion.identity));
    if (randomNumber >2) t3 = (GameObject)(GameObject.Instantiate (obstacle, positionOfPlayer + Vector3.right * 22, Quaternion.identity));
    if (randomNumber >3) t4 = (GameObject)(GameObject.Instantiate (obstacle, positionOfPlayer + Vector3.right * 21 + Vector3.up, Quaternion.identity));
}
In the previous code:
- We create a random number that will range between 1 and 3.
- In all cases we add a first obstacle.
- If the random number is more than one, then we add a second obstacle.
- If the random number is more than two, then we add a third obstacle.
- If the random number is more than three, then we add a fourth obstacle.
You can test your scene, and you should see that the game instantiates different types of obstacles.

Figure 24: Instantiating objects at random
Next, we need to detect collisions between the player and these obstacles; if the player collides with any of the red boxes, we should restart the level. For this purpose, we will modify the script called ControlPlayer as follows:
- Please open the script ControlPlayer.
- Add the following code at the beginning of the file.
using UnityEngine.SceneManagement;
- Add the following code to the function OnCollisionEnter2D.
if (coll.collider.tag == "obstacle") SceneManager.LoadScene (SceneManager.GetActiveScene ().name);
In the previous code, we detect whether we collide with an object that has a tag called obstacle; in this case, the current level (or the active scene) is restarted.
For this to work, we also need to add our current scene to the Build Settings:
- Please open the Build Settings (File | Build Settings or CTRL + SHIFT + B).
- Click on the button called Add Open Scene.

Figure 25: Updating the Build Settings
- This should add the current scene to the settings, as illustrated in the previous figure.
- You can then close the Build Settings.
Displaying the score
So at this stage, the core mechanics work relatively well, as our character can jump over boxes created at random; another interesting feature for this game could be to add a score based on the time; so the longer the player manages to play the game and avoid obstacles, the higher the score. So we will proceed as follows:
- Please create a new UI Text object i.e., (GameObject | UI | Text).
- Rename this object scoreUI.
- Select this object and, using the Inspector, modify its attributes as follows:
- Font color = white.
- Width = 400; height = 200.
- Alignment: centered both horizontally and vertically (see next figure).

Figure 26: Aligning the text
- Font size = 68.
- Position: PosX = 0; PosY = 228 (just at the top of the window)
- Text: empty
After making these changes, your text field should be located as illustrated in the next figure.

Figure 27: Placing the text field for the score
Next, we will create the code to update this UI element.
- Please open the script GenerateObjects.
- Add the following code at the beginning of the script.
using UnityEngine.UI;
- Add the following code at the beginning of the class.
float score;
- Add the following code to the Update function:
score +=Time.deltaTime;

displayScore ();
- Add the following function just before the end of the class (i.e., before the last closing curly bracket).
void displayScore()
{

    GameObject.Find ("scoreUI").GetComponent<Text> ().text = "" + (int)score;

}
You can now test your scene and check that the time is updated accordingly, as illustrated in the next figure.

Figure 28: Updating the time
Level Roundup
In this chapter, we have learned to create a simple infinite runner where the player can jump to avoid obstacles. Along the way, we have learned a few interesting skills including: generating objects randomly, detecting the user’s input, or displaying the time onscreen. So, we have covered considerable ground to get you started with your infinite runner!
Improving the Game
In this section, we will be improving our game by including additional features and modifying the user interface; this will consist in:
- Adding the ability to pause the game.
- Modifying the appearance of the player.
- Modifying the appearance of the obstacles.
- Modifying the appearance of the environment.
Introduction
In this chapter, we will improve the look & feel of our game by adding the following features:
- Some more distinctive attributes for our character (e.g., eye, mouth, etc.)
- Mountains made of basic shapes.
- A sun.
- Clouds that are instantiated randomly.
- Triangular obstacles.
- Trees instantiated along the way.
- A pause button.
Our complete scene will look as follows:

Figure 29: An overview of the game (part 1)
- The trees will be instantiated frequently.
- Objects will have a different depth and we will apply a parallax effect, a visual effect that mimic depth whereby objects closer to the user will move faster onscreen.
- Whenever the game is paused, the player will have the choice to resume or to quit the game.

Figure 30: An overview of the game (part 2)
Creating the static environment
So let’s start to create the static environment that is made of the mountains, the ground and the sun.
- In Unity, using the Hierarchy, please duplicate the object called ground, and call the duplicate ground2.
- Chang its color to a light brown, and move it down slightly, for example to the position (0, -5,0).

Figure 31: Duplicating the ground
We can then start to create mountains:
- From the Project window, create a new triangular sprite (i.e., select: Create | Sprites | Triangle).
- Drag and drop this asset to the Scene view (this will create a new object) and rename the new object mountain.
- Change its scale to (10, 10, 10), its position to (-10, -1, 0), its color to green, and the attribute order in layer to -10, as per the next figure.

Figure 32: Creating a mountain (part1)
The variable called “Order in Layer” defines a depth for an object; the objects with the highest value for the attribute “Order in Layer” will be displayed atop the other objects.
- The mountain should look as in the next figure:

Figure 33: Creating a mountain (part2)
- Please duplicate this object twice (i.e., the mountain), rename the duplicates mountain1 and mountain2, and place the duplicates at the position (-3, -1, 0) and (5, -1. 0), respectively, so that they look like the following figure.

Figure 34: Creating additional mountains
After this, we can create the sky:
- Please duplicate the object called ground (i.e., CTRL + D), and rename the duplicate sky.
- Change its color to a light blue, its position to (0, 0, 0) its scale to (30, 30, 1), and its attribute Order in Layer to -20 (so that any object is displayed atop the sky).
- Using the Inspector, deactivate its component BoxCollider2D. This is because we do not need to detect any collisions with this object.

Figure 35: Deactivating the collider
- The sky object should look as follows, from the Scene view:

Figure 36: The new sky from the Scene view
- The sky should look as follows, from the Game view:
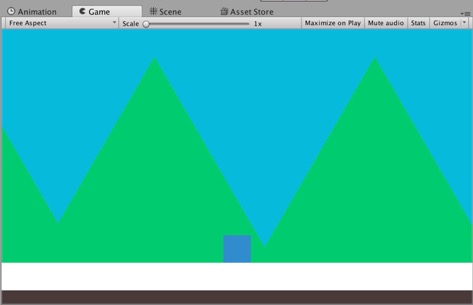
Figure 37: The new sky from the Game view
Next, we will add a sun to the scene:
- From the Project window, create a new circular sprite (i.e., select: Create | Sprites | Circle); this will create a new asset called Circle in the Project window.
- Drag and drop this new asset to the Scene view; this will create a new object called Circle in the Scene view.
- Rename the new object sun.
- Change its position to (12, 3, 0), its scale to (5, 5, 1) and its color to a light yellow, as per the next figure.

Figure 38: Adding the sun
Once this is done, we will add a few clouds generated randomly, to add some life to the scene.
- Please create a new polygonal sprite: from the Project window (i.e., select Create | Sprites | Polygon).
- Rename it cloud.
- The Sprite Editor will open. If the Sprite Editor does not open automatically, you can select the cloud asset that you have just created, and then click on the button called Sprite Editor, as illustrated in the next figure.

Figure 39: Opening the Sprite Editor from the Inspector
- Once the Sprite Editor is open, you should see the polygonal sprite asset that you have just created.

Figure 40: Opening the Sprite Editor
- In the top-left corner of the window, enter the number 10 (for 10 sides), then press the button labelled Change. This will modify the polygon so that it now includes 10 sides; we could, of course create more sides for our asset, but 10 should be sufficient to give convey the idea of a cloud.

Figure 41: Creating 10 sides
- Press the button called Apply located in the top-right corner of the window, so that these changes can be applied to the polygon.

Figure 42: Applying changes
- Please close the Sprite Editor window.
- Drag and drop the asset called cloud from the Project view to the Scene view.
- This will create an object called cloud.
- Using the Inspector, modify the scale of this object to (1, 0.5, 1).
- This object will look like the one illustrated in the next figure.

Figure 43: Rescaling the cloud
- You can then create a new cloud prefab by dragging and dropping this object (i.e., the cloud) to the Project view.

Figure 44: The new cloud prefab
- Once this done, you can deactivate (or delete) the object called cloud in the Hierarchy window.
We will now modify our scripts so that the game generates clouds at regular intervals:
- Please create a new script called Cloud (i.e., from the Project window, select Create | C# Script).
- Add the following code to it (new cold in bold):
void Update ()
{
    transform.Translate (Vector2.left *Time.deltaTime);
    if (transform.position.x < -10) Destroy (gameObject);
}
- Please save your code, check that it is error-free, and drag and drop the script Cloud on the prefab called cloud.
We can then modify the script GenerateObjects so that we can generate these clouds:
- Please open the script GenerateObjects.
- Add the following code at the beginning of the class:
float cloudTimer;

public GameObject cloud;
- Add the following function just before the end of the class (i.e., before the last closing curly bracket).
void createClouds()
{
    cloudTimer+=Time.deltaTime;
    GameObject cloud1;
    Vector3 topRightCorner = GameObject.Find ("topRightCorner").transform.position;
    int altitude = Random.Range(0,2);
    if (cloudTimer >= 10)
    {
        cloud1 = (GameObject)(GameObject.Instantiate (cloud, topRightCorner + -Vector3.up * altitude , Quaternion.identity));
        cloudTimer = 0;
    }
}
In the previous code:
- The timer for the cloud is incremented every 10 seconds.
- A random variable called altitude is created.
- Every 10 seconds, a new cloud is created based on the position of the object called topRightCorner (that we yet have to create) and its relative height is based on the variable called altitude.
Since the function has been created, we can now call it from the Update function, so that the clouds are instantiated at regular intervals.
- Please add the following code to the Update function:
createClouds ();
We can now create the object topRightCorner.
- Please create a new empty object and rename it topRightCorner (i.e., GameObject | Create Empty).
- Place it in the top-right corner, as illustrated in the next figure.

Figure 45: Defining the top-right corner of the screen
Last but not least:
- Select the object generateObjects in the Hierarchy.
- In the Inspector, locate the component called GenerateObjects, and the variable called cloud.

Figure 46: Locating the cloud variable in the Inspector
- Drag and drop the cloud prefab to the variable cloud for the component GenerateObjects.

Figure 47: Assigning a value to the cloud variable
- As you test the scene you should see clouds generated randomly and moving to the left.

Figure 48: Clouds generated randomly.
Once you have checked that the clouds are generated properly, we will start to modify the appearance of the obstacles:
- In the Project window, please select the prefab called obstacle.
- Using the Hierarchy, scroll-down to the component called Sprite Renderer, and click on the small circle to the right of the Sprite label, as described in the next figure.

Figure 49: Changing the sprite for an object
- From the new window, select (i.e., double-click) on the option Triangle.

Figure 50: Selecting the sprite called Triangle (part1)
- This should set the sprite Triangle for this object, as illustrated in the next figure.

Figure 51: Selecting the sprite called Triangle (part 2)
- As you play the scene, you will see that the shape of the obstacles is now triangular.
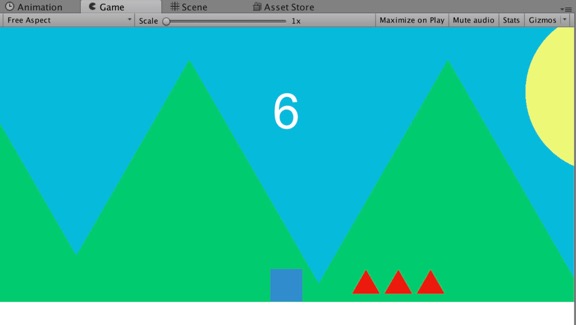
Figure 52: Using triangular obstacles
You may notice that these obstacles are now slightly above the ground; so we could modify the script GenerateObjects as follows (new code in bold):
Vector3 positionOfPlayer = GameObject.Find ("player").GetComponent<ControlPlayer>().initialPosition + Vector3.down * .3f;
In the previous code, we use the built-in function Vector3.down to move down the obstacles.
If this does not move down the obstacle, you can also edit the collider of the obstacle (now a triangle) as follows:
- Drag and drop the prefab called obstacle to the Scene view.
- Select it, and using the Inspector view, scroll down to the component called Box Collider.
- Click on the button labelled Edit Collider.

Figure 53: Editing the collider
In the Scene view, drag and drop the bottom edge of the collider upwards.

Figure 54: The sprite collider before the change

Figure 55: The sprite collider after the change.
- Click again on the button labelled Edit Collider to end the modification of this collider.
- Apply the changes to the corresponding prefab by clicking on the Apply button (located in top-right corner of the Inspector window).

Figure 56: Applying changes to the obstacle prefab
- Delete the object that you have just modified from the scene.
Next, we will add some distinctive features to our character, including eyes and a mouth:
- Please drag and drop the asset called Circle from the Project window to the Scene view. This asset was used to create the sun; if unsure, you can create a new Circle sprite by selecting Create | Sprites | Circle from the Project window, and drag and drop it to the Scene view.
- This will create an object called Circle in the Hierarchy.
- Rename this object eye.
- In the Hierarchy, drag and drop this object on top of the object player, so that it becomes a child of the object player.
- Change its position to (0.25, 0.2, 0) and its scale to (0.4, 0.4, 1).

Figure 57: Creating the eyes
- Duplicate the object called eye and rename the duplicate pupils.
- Change its scale to (.3, .3, .3) and its color to black.

Figure 58: Creating the pupils
Next, we will create the mouth:
- Duplicate the object pupils and rename the duplicate mouth.
- Using the Hierarchy, scroll-down to the component called Sprite Renderer for this object, and click on the small circle to the right of the label called Sprite, as described in the next figure.

Figure 59: Changing the sprite
- From the new window, select (i.e., double-click on) the option ground.

Figure 60: Selecting the ground sprite (part 1)
- The Sprite renderer should then look as follows:

Figure 61: Selecting the ground sprite (part 2)

Figure 62: Finalizing the mouth
- You can adjust the position of the mouth to (.29, -.23, 0) and its scale to (0.41, 0.13, 1).
- So that both the mouth and the pupils are visible, set their attribute Order in Layer to 1 (this is so that they are displayed atop the other objects).
If you wish, you can add more distinctive features to the character using the same principle.
You can now test your game and check the look of the player character.

Figure 63: The character with added features
Pausing the game
In this section, we will add a mechanism by which the player can pause the game.
- A pause button will be displayed in the top left corner of the screen.
- When this button is pressed, the message “Game Paused” will be displayed, along with two buttons to either exit or resume the game.
- If the player resumes the game, both the resume and exit buttons, along with the text will be hidden.
So let’s get started!
- In Unity, create a new button (i.e., GameObject | UI | Button).
- Rename it resumeBt.
- Change the label of this button to Resume.
To change the label of a button, you can select the Text object that is a child of this object, and then select this object and, using the Inspector window, modify its text component.

Figure 64: Identifying the text of the button’s label in the Hierarchy

Figure 65: Modifying the label of the button
- Once you have changed its label, please duplicate this button (i.e., CTRL + D).
- Call the duplicate exitBt.
- Change the label of the duplicate to Exit.
- Move these button, so that you obtain a layout similar to the one described in the next figure.

Figure 66: A layout for the buttons
Next, we will create a simple text label that will indicate that the game is paused.
- Please create a new UI Text object (GameObject | UI | Text).
- Rename it gamePaused.
- Change its text to >> Game Paused <<, its color to white, its width to 500, its height to 200, its font size to 40, and its alignment so that it is centered both vertically and horizontally.
- You may also move this text field above the previous two buttons to obtain a layout similar to the one illustrated in the next figure.

Figure 67: Completing the layout for the buttons and the text
Next, we will create the pause button; it will be based on an image that is available in the resource pack.
- Please duplicate the object exitBt, and rename the duplicate pauseBt.
- Empty its label.
- Move the button to the top left corner, as per the next figure.

Figure 68: Adding the pause button
We will now import a sprite for the pause button and apply it to this button:
- Locate the file called pause.png in the resource pack.
- Import this file into your project (i.e., drag and drop).

Figure 69: Importing the pause button
- Select this asset in the Project window.
- Using the Inspector, change its texture type to Sprite (2D and UI) and its Sprite Mode to Single, so that it can be displayed on the user interface.

Figure 70: Changing the attribute of the button
- Once this is done, you can press the button labelled Apply, located in the bottom-right corner of the Inspector window.
![]()
Figure 71: Applying changes to the button
- Select the button pauseBt in the Hierarchy.
- Using the Inspector, scroll down to its component called Image.

Figure 72: Modifying the appearance of a button
- Modify the Source Image by clicking on the circle to the right of the label Source Image.

Figure 73: Changing the image of a button
- In the new window, select (double click) the asset called pause:

Figure 74: Selecting a new image for the button
- You can then modify the width and height of the button to (100, 100) and its scale to (0.5, 0.5, 1) and adjust the position of the button so that it fits within the screen, and to obtain a layout similar to the one illustrated in the next figure.

Figure 75: The final layout
Now that we have defined the appearance and location of our buttons, we will write the necessary code to handle clicks (or taps) on these buttons.
- Please create a new empty object called manageBt (GameObject | Create Empty).
- Create a new C# script called ManageBT (i.e., from the Project window, select: Create | C# Script).
- Drag and drop this script to the object manageBt.
- Open the script manageBT.
- Add the following code at the beginning of the script.
using UnityEngine.SceneManagement;
The previous code is necessary so that we can use the built-in function SceneManager.LoadScene.
- Add the following code just before the end of the class:
public void startGame()
{
    SceneManager.LoadScene("chapter1");
}

public void resume()
{
    GameObject.Find("player").GetComponent<ControlPlayer>().resume();
}
public void pause()
{
    GameObject.Find("player").GetComponent<ControlPlayer>().pause();
}

public void exit()
{
    Application.Quit ();
}
In the previous code:
- We define functions that will be called in case the game is started, resumed, stopped, paused or exited.
- The function start loads the scene called chapter1.
- The function resume calls the function resume that is part of the class ControlPlayer. The latter is public; this is the reason why it can be accessed from outside its class.
- The function pause calls the function pause that is part of the class ControlPlayer. The latter is public; this is the reason why it can be accessed from outside its class.
- The function exit just exits/quits the game.
Next, we will need to modify the script called ControlPlayer to include the function pause or resume:
- Please open the script called ControlPlayer.
- Add this code at the beginning of the class:
GameObject btPause, btExit, btResume, gamePausedTxt;
public bool paused;
In the previous code, we define placeholders that will be linked to the corresponding buttons (i.e., start, resume, exit, etc.).
- Modify the Start function as follows (new code in bold):
void Start ()
{
    paused = false;
    initialPosition = gameObject.transform.position;
    gamePausedTxt = GameObject.Find ("gamePaused");
    btResume = GameObject.Find ("resumeBt");
    btExit = GameObject.Find ("exitBt");
    btPause = GameObject.Find ("pauseBt");
    displayPauseButtons (false);
}
In the previous code:
- We state that the game is not paused yet.
- We initialize the objects created earlier and link them up to the corresponding buttons.
Now that we have initialized these variables, we will define the actions to be performed when the functions pause, resume, and displayPauseButtons are called.
- Please add the following code just before the end of the class (i.e., ControlPlayer):
public void pause()
{
    paused = true;
    displayPauseButtons (true);

    Time.timeScale = 0;
}

void displayPauseButtons(bool state)
{


    gamePausedTxt .SetActive (state);
    btResume.SetActive (state);
    btExit.SetActive (state);
    btPause.SetActive (!state);

}

public void resume()
{

    Time.timeScale = 1;
    displayPauseButtons (false);
}
We can now allocate actions to buttons:
- Please select the button pauseBt.
- Using the Inspector, scroll down to the component called Button.
- Click on the + button.

Figure 76: Handling events (part 1)
- This will show new attributes; you can click on the circle to the right of the field None (Object), as illustrated in the next figure.

Figure 77: Handling events (part 2)
- In the new window, select manageBt.

Figure 78: Handling events (part 3)
- In the Inspector, click on No Function, and select ManageBt | pause, as illustrated in the next figures.

Figure 79: Handling events (part 4)

Figure 80: Handling events (part 5)
- Once this is done, repeat the previous steps so that the button exitBt is linked to the function exit, and so that the button resumeBt is linked to the function resume.
You can then play the scene and check that you can pause the game.
Level Roundup
Summary
In this chapter, we have managed to improve the look and feel of the game by creating a 2D environment that includes mountains, and clouds generated randomly; along the way, we also added the possibility for the player to pause, quit, or resume the game.
Frequently Asked Questions
This chapter provides answers to the most frequently asked questions about the features that we have covered in this book. Please also note that some videos are also available on the companion site to help you with some of the concepts covered in this book.
What is the concept of an infinite runner?
In an infinite runner, the main character progresses forward indefinitely, and has to, along the way, avoid or collect items; the challenge for the player lies in keeping the character running (or progressing forward) as long as possible.
How Can I improve my game based on this tutorial?
There are many things you could do to take your game to the next level, including: using adding background sound and sound effects, adding animated 2D characters, making it possible to collect objects, or adding Non-Player Characters, like birds dropping objects near the player every now and then.
Can I extend this concept to 3D infinite runners?
Yes; 2D and 3D infinite runners share many features; one of the key differences is that for a 3D runner, the character will probably run forward; however, you will, as for the 2D version, need to generate 3D objects randomly (adding the z coordinate) and a camera that follows the player also.