

Introduction
Following the first part of the tutorial on 2D Shooter Games, we will, in this second part of the tutorial, learn how to:
- Spawn meteorites randomly
- Move these meteorites by applying forces
- Destroy these meteorites
Destroying the target
Now that we can shoot missiles (or bullets), we just need to be able to destroy the objects colliding with the missiles; so we will create new objects that will be used as targets for the time being.
- Please create a new Square sprite (from the Project window, select: Create Sprites | Square) or you can also duplicate the player sprite if you wish.
- Rename this new sprite target.
- Drag and drop this sprite to the Scene view.

Figure 13: Adding a target to the scene
- This will create a new object; rename this new object target.
- Please select this object.
Add a BoxCollider2D to this object (i.e., select Components | Physics2D | BoxCollider2D from the top menu). This is so that collisions can be detected.
We will now create a new tag for this object. A tag; will help to identify each object in the scene, and to see the object that the bullets (or the player) are colliding with.
- Please select the object called target in the Hierarchy.
- In the Inspector window, click on the drop-down menu called Untagged (to the right of the attribute called tag), as described on the next figure.

Figure 14: Creating a tag (part1)
- From the drop-down menu, please select the option Add Tag…

Figure 15: Creating a tag (part 2)
- In the new window, click on the + button that is located below the label “Tags/List is Empty”.

Figure 16: Creating a tag (part 3)
- Please specify a name for your tag (i.e., target), using the field to the right of the label Tag 0.

Figure 17: Adding a tag (part 2)
- Press the Enter/Return key on your keyboard to save your new tag.
- Select the object target in the Hierarchy again, and, using the Inspector, select the tag target, that you have just created.

Figure 18: Adding a tag (part 3)
- Last but not least, we will create a prefab from this target by dragging and dropping the object target to the Project window.
Next, we will create a new script that will be linked to the bullet (or missile), so that, upon collision with a target, this target should be destroyed (based on its tag).
- Please create a new script called Bullet: from the Project window, select Create | C# Script.
- Open this script.
- Add the following code to it (just after the function Update).
void OnCollisionEnter2D(Collision2D coll)

{
	if (coll.gameObject.tag == "target")
	{
		Destroy (coll.gameObject);
		Destroy (gameObject);
	}
}
In the previous code:
- We detect the objects colliding with the bullet.
- When this occurs, we check if this object is a target; if this is the case, this target is then destroyed.
- The bullet is also destroyed in this case.
Once this is done, we can save our script and link it to the bullet prefab.
- Please save the script called Bullet and check that it is error-free.
- Once this is done, please drag and drop it on the prefab called Bullet, in the Project window.
- You can then click once on the prefab called bullet, and check, using the Inspector window, that it includes the script Bullet.
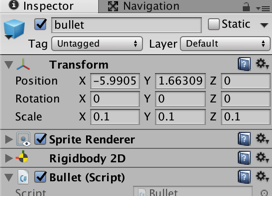
Figure 19: Checking the components of the Bullet prefab
Last but not least, we will need to add a collider to our Bullet prefab, so that it actually collides with other objects:
- Please select the prefab called bullet.
- From the top menu, select Components | Physics2D | BoxCollider2D.
You can now test your game:
- Move the target object just above the player, as illustrated in the next figure.
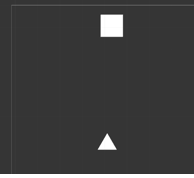
Figure 20: Checking the bullet prefab
- Please play the scene, fire a missile (i.e., press the space bar), and check that, upon collision between the bullet and the target, both objects are destroyed.
Note that since you will be firing several bullets, we could choose to destroy a bullet after 10 seconds (by this time it should have hit a target), by modifying the script Bullet as follows (new code in bold):
void Start ()
{
	Destroy (gameObject, 10);
}
You can test your scene and see that after 10 seconds the bullet is destroyed.
Before we go ahead, it may be a good idea to save our scene:
- Please select File | Save Scene As from the top menu, and save your scene as level1.
- You can also save your project (File | Save Project).
Next, we will just create a slightly different type of target; that is: a moving target that will move downwards and that the player will have to avoid or to destroy; so let’s implement this feature:
- Using the Project window, please duplicate the prefab called target, that we have just created (i.e., select the target prefab, and the press CTRL + D).
- Rename the duplicate moving_target (i.e., right-click + Rename[PF1] ).
- Select the prefab moving_target in the Hierarchy and add a RigidBody2D component to it (i.e., select Component | Physics2D | RigidBody2D).
- Using the Inspector window, set its attribute called Gravity Scale (for the component Rigidbody2D) to 0, as illustrated on the next figure. This is so that the object does not fall indefinitely (since it is a top-down view).

Figure 21: Adjusting the gravity scale
Next, we will create a script that will be linked to this object and that will set its initial velocity downwards.
- Please create a new C# script called MovingTarget.
- Modify the Start function as follows (new code in bold).
void Start ()
{
	GetComponent ().velocity = Vector2.down * 10;
}
In the previous code, we access the Rigidbody2D component of the object linked to this script (this will be the moving target), and then set the velocity downwards.
- You can now save your script, check that it is error-free, and drag and drop it to the prefab called moving_target.

Figure 22: Linking the script to the target
- So that we can test the scene, please drag and drop the prefab moving_target to the Scene view and play the scene, you should see that this particular target moves downwards.

Figure 23: Adding a moving target to the scene
Spawning moving targets randomly
Last but not least, we will create a mechanism through which the moving targets are created randomly, a bit like meteorites, so that flying “meteorites” appear randomly onscreen and move downwards. For this, we will be doing the following:
- We will create an empty object that will spawn these moving targets.
- These will be instantiated at regular intervals and at random positions.
- We will also ensure that the moving targets are spawned in the current view (i.e., relatively close to the player so that they can be captured and displayed by the camera).
So let’s get to it:
- Please create a new empty object called targetSpawner in the Hierarchy window (i.e., select GameObject | Create Empty).
- Create a new C# script called SpawnMovingTargets.
- Open the script.
- Add the following code at the beginning of the class (new code in bold):
public class SpawnMovingTargets : MonoBehaviour
{
	float timer = 0;
	public GameObject newObject;
- Add the following code to the Update function (new code in bold):
void Update ()
{
	timer += Time.deltaTime;
	float range = Random.Range (-10, 10);
	Vector3 newPosition = new Vector3 (GameObject.Find("player").transform.position.x + range, transform.position.y, 0);
	if (timer >= 1)
	{
	     GameObject t = (GameObject)(Instantiate (newObject, newPosition, Quaternion.identity));
	     timer = 0;
	}

}
In the previous code:
- We increase the value of our timer every seconds.
- We then define a variable called range; it will be a random number between -10 and 10; this variable will be used to define a random position that is to the left (i.e., -10 to 0) or to the right (i.e., 0 to +10) of the player; this is so that the target instantiated is close enough to the player and within the field of the view of the camera.
- We then create a new vector called newPosition that uses the variable range defined earlier for the x coordinate; the y-coordinate of the object linked to this script (this will be the empty object targetSpawner) is then used for the y-coordinate of the object that is being instantiated.
- A new object is then instantiated every second: every time the value of the variable timer is greater than 1, timer is reset to 0 and a new prefab (i.e., moving target) is instantiated
There are of course many other ways to create this feature, but this version is relatively simple, to start with.
Next, we just need to set-up the targetSpawner object:
- Please check that the script that you have just created is error-free.
- Drag and drop this script (i.e., SpawnMovingTargets) to the object called targetSpawner in the Hierarchy. Alternatively, you can add the script to the object targetSpawner by selecting this object in the Hierarhcy, and by then dragging and dropping the script (i.e., SpawnMovingTargets) to the Inspector window, as illustrated on the next figure.

Figure 24: Adding a script to the object targetSpawner
- Please select the object targetSpawner in the Hierarchy window.
- Drag the prefab called moving_target from the Project window to the field called newObject in the Inspector, as described in the next figure.

Figure 25: Setting the prefab to be spawn (part 1)
- The component SawnMovingTarget should then look as follows.

Figure 26: Setting the prefab to be spawn (part 2)
Last, using the Scene view, we just need to move the object called targetSpawner at the upper boundary of the screen; this is so that the moving targets are instantiated at the very top of the screen, just above the player.

Figure 27: Moving the targetSpawner object
Once this is done, you can delete or deactivate the objects called moving_target and target that are already in the scene (i.e., the two squares that you could see in the previous figure), and test the scene. To deactivate these objects, you can select them and, using the Inspector window, uncheck the box to the left of their name.
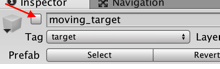
Figure 28: Deactivating the moving target

Figure 29: Deactivating the target
As you play the scene, you should see that a new moving target is instantiated every second at random, as described on the next figure.

Figure 30: Spawning moving targets
Managing Damage
Now that we have created a moving target that the player can shoot, we will create a script that manages the damage taken by the target so that it is destroyed only after being hit several times by the player’s bullets.
- Please create a new script called ManageTargetHealth (i.e., select Create | C# Script from the Project window)
- Add the following code at the beginning of the class (new code in bold).
public class ManageTargetHealth : MonoBehaviour {

public int health, type;

public static int TARGET_BOULDER = 0;
- In the previous code, we create three variables: health, type, and TARGET_BOULDER.
- health will be used to determine the health (or strength) of each target so that we know how much damage it can sustain before being destroyed.
- type is used to set different types of targets; each of these will have different levels of health (or strength).
- TARGET_BOULDER will be used as a type for our moving targets (i.e., boulders). Note that this variable is both static and public; this means that it can be accessed from outside its class; also, because it is static, this variable can be accessed without the need to instantiate a new object of type ManageTargetHealth.
We will come back to this principle later, but in a nutshell, static variables and functions can be used by other classes with no instantiation required; you can consider these static variables and functions as utility classes and variables that can be used without the need to be part of a particular class, a bit like a friend granting your access to his or her car without the need for you to be the owner. For example, the function Debug.Log can be used from anywhere in your game, although, you don’t need to instantiate an object of type Debug for this purpose; the same holds true for the function GameObject.Find; again, you can use this function to find a particular object; however, you don’t need to instantiate an object of class GameOBject to be able to use this function Find.
Now, we just need to specify the health (or strength) of the target, based on its type, in the Start function.
- Please add the following code to the Start function (new code in bold).
void Start ()
{

	if (type == TARGET_BOULDER) health = 20;

}
- Add a new function called gotHit, at the end of the class (i.e., before the last closing curly bracket) as follows:
public void gotHit(int dammage)
{
	health-= dammage;
	if (health <= 0)
	destroyTarget ();
}
In the previous code:
- We declare a function called gotHit; its return type is void because it does not return any value; it takes a parameter of type int that will be referred to as damage within this function.
- We then set the value of the variable health by subtracting the value of the variable damage from the previous value of the variable health; this is equivalent to the following code:
health = health – damage;
- If the health is 0 or less, we then call the function called destroyTarget.
We now just need to create the function called destroyTarget.
- Please add a new function called destroyTarget at the end of the class (i.e., before the last closing curly bracket) as follows:
public void destroyTarget()
{

	Destroy (gameObject);

}
In the previous code:
- We create a new function called destroyTarget of type void (since it does not return any value).
- This function destroys the object linked to this script (i.e., the target).
Once this is done, we can save and use this script:
- Please save your code and check that it is error-free.
- Using the Project view, drag and drop this script (i.e., ManageTargetHealth) on both the target and the moving_target prefabs.
Next, we just need to modify the script SpawnMovingTarget so that we specify the type of the target that is to be created.
- Please modify the spawning script (i.e., SpawnMovingTargets) as follows (new code in bold).
if (timer >= 1)
{
	GameObject t = (GameObject)(Instantiate (newObject, newPosition, Quaternion.identity));
	t.GetComponent ().type = ManageTargetHealth.TARGET_BOULDER;
	timer = 0;
}
In the previous code: we specify that the value of the variable called type, for the script called ManageTargetHealth, that is a component of the object t is TARGET_BOULDER.
Note that we have accessed the static variable TARGET_BOULDER from the class ManageTargetHealth without instantiating an object of type ManageTargetHealth; this is because the variable TARGET_BOULDER is static.
Last but not least, we can add the following code to the script Bullet.
if (coll.gameObject.tag == "target")
{
	//Destroy (coll.gameObject);
	coll.gameObject.GetComponent().gotHit(10);
	Destroy (gameObject);
}
You can now play the scene and test that the moving targets disappear after being hit twice.
For testing purposes, you can also drag and drop the script ManageTargetHealth on the prefab called target, reactivate the object target in the Scene view, and then fire bullets at this target. It should disappear after two bullets have been fired.
This tutorial is an excerpt from the book “A Beginner’s Guide to 2D Shooter Games“.
